
I've brewed without a starter, pitching a single Wyeast smack pack and it worked. I've pitched the scrapings of 10 petri plates and it worked. I've pitched the scrapings of 5 petri plates and it worked. I've pitched standard starters and it worked. I've pitched aerobic starters and it worked. I've racked new wort on the yeast cake from a previous batch and it REALLY worked! The brewing process can be very forgiving if you are compulsive about sanitation.
I've pampered my yeast and I've abused my yeast and found no difference in the result. Abuse turns out to be easier.
Yeast Nutrient: Use whatever you want
including a B-complex-vitamin tablet. YEAST NITROGEN BASE: DIFCO
Laboratories, Bacto Yeast Nitrogen Base w/o
amino acids. Catalog # 0919-15-3. Contains all essential vitamins and
inorganic salts necessary for the cultivation of yeasts except histidine,
methionine, and tryptophan and a source of carbohydrate.
Usage: 6.7 grams per 1000 ml.
Mix and boil covered for 45 minutes. Watch for boil over.
The right equipment makes a job a joy rather than a hassle. If you want to make good starters easily, and you brew enough, or you are just a gear-head, the right equipment will help. Here's a list.
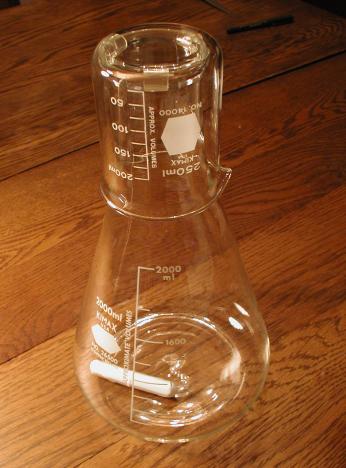
We are going to build a cell culture system. Those are pretty high-falutin' words for a simple idea. A standard cell culture flask is a squat erlenmeyer flask with a relatively narrow neck. The flask comes with a stainless steel sleeve (basically a cup) that has raised radial spokes pressed into the bottom and lengthwise down the sides. This sleeve is inverted over the mouth of the flask and down the flask neck and acts as a "nasty" barrier. The raised spokes keep the bottom and sides of the sleeve a few millimeters away from the mouth and sides of the flask neck, leaving the flask open to the air by a route tortuous to any "nasties". O2 can diffuse into the flask by traveling up, and CO2 can diffuse out by traveling down, but unless the flask is in gale force winds microbes can't float up under the stainless sleeve and into the flask. After innoculation the media is agitated in the flask, either shaken or stirred.
The 2 liter flask is used as the cell culture flask. The 250 ml beaker is used as the stainless steel sleeve. The slit pieces of vinyl tubing are used as the radial spokes pressed into the stainless steel sleeve.
The 1/2" pieces of slit vinyl tubing clip over the mouth of the flask and keep the bottom of the inverted beaker from sealing the flask. If a soup can is used intead of a beaker or glass, the bottom of the can can be radially dented in an 'X' pattern to keep it above the mouth of the flask.
I am compulsive about sanitation. Many, many brewing sins can be forgiven or overlooked or gotten away with, with good sanitation.
I love IODOPHOR.
I use B-T-F. The ingredients are listed as:
It's easy to sanitize the system. Clip the vinyl bits equally spaced to the rim of the flask. Fill the flask to the brim with iodophor solution. Fill the beaker to the brim with iodophor solution. Drop the stir bar into the beaker. Let it all sit while you prepare he media according to the above recipe.
After the media comes to a boil. Dump out the iodophor from the flask saving some in a pan or baking dish. You need about 1-2" of depth. After emptying the flask immediately invert it into the shallow pan of iodophor. This will sanitize the rim and vinyl bits and drain the inside of the flask. The flask and beaker can sit like this indefinitely and remain sanitary, so don't worry about time.
After 45 minutes of covered boil/simmer let the media sit covered and cool for an hour or so. This is to reduce the already low risk of fracturing the flask when filling. As long as the lid is on the pot the risk of infection is minimal, so do not uncover the pot until ready to fill the flask.
Pull the flask out of the iodophor and set it in a clean sink. Fill the flask with the hot media. You need 1500-1600 ml of media. Any more and you risk blowoff from the fermentation. If you want to use a funnel be sure that it was sanitized with iodophor with the other components. Do not worry about a few drops of iodophor solution getting into the starter. The yeast will never know it's there.
Empty the beaker and drop the stir bar into the flask. Don't just plunk it down the middle as it might drop straight to the bottom and crack the glass. Tilt the flask and slide it down. With some practice with water filled flask and beaker you will learn to drain the beaker without losing the stir bar, then "pour" the stir bar from the beaker to the flask without ever touching it (or sanitize kitchen tongs). Invert the beaker over the mouth of the flask.
Here comes the abusive part. Parents may want to send their children from the room.
Innoculate the starter media.
Now that's a short simple sentence that stirs up great emotion in some. Some say you have to step up your starters from 2 ml to 20 ml to 200 ml to 1000 ml. Some say the poor little yeasties are traumatized by being dumped into vast volumes of empty media. I suppose the little critters are lonely. NOT! As a great man once told me while we were framing a house, "Hey! We're not building cabinets here!" And, we are not brewing pharmaceuticals here. We are making beer. It is true that in some kinds of cell culture with some kinds of cells, growth is greatly influenced by cell density. And, in all honesty, to some extent it probably influences yeast too. To that I say, "so what?" There's a vast region between optimal and detrimental.
Some say that gently stepping up the starter allows the yeast to out-compete any nasties, and therefore you gain a measure of infection resistence. I say that mucking about with the starter media 3 or 4 times in a microbial rich kitchen introduces more danger of infection than simply doing it once with compulsive attention to sanitation. The decision is of course an individual one. I may speak in mocking tones and a flippant voice, but good people make good beer in an infinite variety of ways, and although I do tend to strong opinion I also do not cast aspersions upon those who hold differing views.
This is my innoculation procedure for a Wyeast smack pack. The yeast is NOT in the internal smack pack, so don't smack the pack. You will cut off one corner of the foil pouch, so sanitize the top of the pouch and the scissor in iodophor. Shake off the scissor and shake off the pouch. Cut the corner off the pouch and pour the contents into the flask.
Innoculating from a plate is easy too. Choose your plate. Sanitize a teaspoon. Pour some media into the plate and use the back of the spoon and the edge (gently!) to suspend the yeast in the media. Pour it from the plate into the flask.
Set it on the magnetic stirrer and stir briskly.
You can monitor the course of the fermentation by turning off the stirrer for minutes to hours and checking bubble/foam formation. I have found that 3-4 full days of stirred fermentation is about it. The starter starts off looking like a flask of cola and over a few days it turns into chocolate milk.
After fermentation is complete I remove the stir bar and refrigerate the flask and media. To remove the stir bar use a magnet to capture it and slide it up the side of the flask and out. Practice with water a few times. Sanitized foil should be substituted for the inverted beaker upon refrigeration. Don't be frugal with the foil, and use enough to cover most of the flask neck. After a few days, or up to 2 weeks, the yeast has settled and formed a nice compact cake on the bottom. At the start of refrigeration the starter looks like chocolate milk and over a few days turns back into cola. On brew day, the liquid portion of the starter can be poured off, new wort diverted onto the yeast cake and used to resuspend the yeast. Pitch the slurry.
Some say that pitching a slumbering starter is bad form. Some say that starters should be pitched at the peak of their activity, when their glycogen reserves are optimal and they are near the end of their logarithmic growth phase. I refer you to the above quote about cabinets. I ask, what's wrong with waking up to a breakfast feast? What's the difference between pitching active yeast and slumbering yeast, when in an hour the slumbering yeast will be wide awake and well on their way to maximum glycogen reserves and logarithmic growth anyway?
With the above technique used to pitch 5 to 6.5 gallon batches, I get lag times around 3-4 hours at a fermentation temperature around 68 F (20 C).